Tips on Setting up Bitnami WordPress on AWS
After creating two WordPress themes, I wondered how I can show a different theme of a WP site without creating two different WP sites. Multisite is the solution that I found.
Multisite is a feature of WordPress 3.0 and later versions that allows multiple virtual sites to share a single WordPress installation. When the multisite feature is activated, the original WordPress site can be converted to support a network of sites.
Since I deployed my Bitnami WordPress Multisite on AWS, I’ll share some tips on the setup. These tips includes:
- Connecting to the server using Transmit or SSH in Terminal
- Making Multisite use subdirectory instead of subdomain
If you want to follow these instructions, you should’ve already set up a WordPress site on AWS following this tutorial by Amazon. Note: in step 6, be sure to create a new key pair or choose an existing one. We’ll need that to connect to the server.
Now, let’s get down to the details.
Connecting to the server
In order to edit files on the server, you need to connect to it and there are two ways of doing that. You can either connect using a file transfer application, or connect using SSH in Terminal.
Using a file transfer application
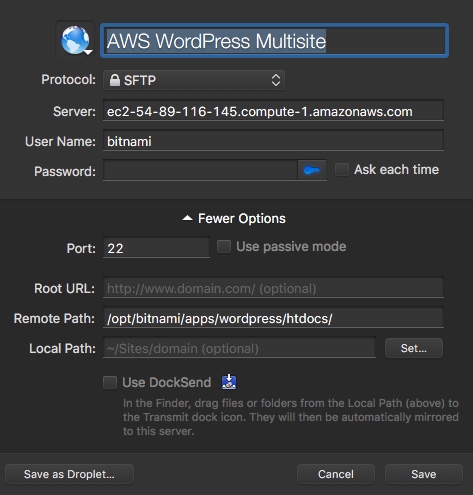
Here I use a file transfer app called Transmit.
Fill out the connection setting as below whereas replacing your own server and dragging in your key pair for the password.

Using SSH in Terminal
The following instructions are given by Amazon. You can find them by selecting an instance in AWS Console Home, then click “Connect”.

In the example above, replace it with your key pair’s location, username and server accordingly, then run the command.
For example, mine is this:
ssh -i ~/.ssh/aws-wordpress-key-pair.pem [email protected]
Making Multisite use subdirectory instead of subdomain
In default, Multisite is in subdomain mode. However, In my case, I want my two demo sites to be two subdirectories within the main directory. i.e. wp.lanihuang.com is the main site, while wp.lanihuang.com/lhp and wp.lanihuang.com/b2w are the two demo sites.
In order to achieve this, you need to do 3 things:
- Turn off subdomain mode
- Change Multisite’s URL rewrite rules
- Enable reading of the
.htaccessfile
ATTENTION: Backup setting files before modifying them.
Turn off subdomain mode
After connecting to the server, you can find the WP folder at /opt/bitnami/apps/wordpress/htdocs/.
In wp-config.php, find the following line:
define( 'SUBDOMAIN_INSTALL', true );
Change that to:
define( 'SUBDOMAIN_INSTALL', false );
Then, you’ll be able to create subdirectory sites in the admin area.
Change Multisite’s URL rewrite rules
Open .htaccess file, and replace everything with:
# BEGIN WordPress
<IfModule mod_rewrite.c>
RewriteEngine On
RewriteBase /
RewriteRule ^index\.php$ - [L]

# uploaded files
RewriteRule ^([_0-9a-zA-Z-]+/)?files/(.+) wp-includes/ms-files.php?file=$2 [L]

# add a trailing slash to /wp-admin
RewriteRule ^([_0-9a-zA-Z-]+/)?wp-admin$ $1wp-admin/ [R=301,L]

RewriteCond %{REQUEST_FILENAME} -f [OR]
RewriteCond %{REQUEST_FILENAME} -d
RewriteRule ^ - [L]
RewriteRule  ^[_0-9a-zA-Z-]+/(wp-(content|admin|includes).*) $1 [L]
RewriteRule  ^[_0-9a-zA-Z-]+/(.*\.php)$ $1 [L]
RewriteRule . index.php [L]
</IfModule>
# END WordPress
This basically enables WP to redirect to the subdirectory sites.
Enable reading of the .htaccess file
Last but not least, you have to manually enable the .htaccess file because it is not enabled by default on Amazon Linux.
Open the file /opt/bitnami/apps/wordpress/conf/httpd-app.conf, and look for the following snippet:
...
<Directory "/opt/bitnami/apps/wordpress/htdocs">
    Options +MultiViews +FollowSymLinks
    AllowOverride None
    <IfVersion < 2.3 >
        Order allow,deny
        Allow from all
    </IfVersion>
    <IfVersion >= 2.3>
        Require all granted
    </IfVersion>
...
Change AllowOverride None to AllowOverride All.
Restart the Apache server after change:
sudo ~/stack/ctlscript.sh restart apache
Now, the sever will read the .htaccess file.